5 Viral Ink Splash AI Photo Editing Prompts 2026
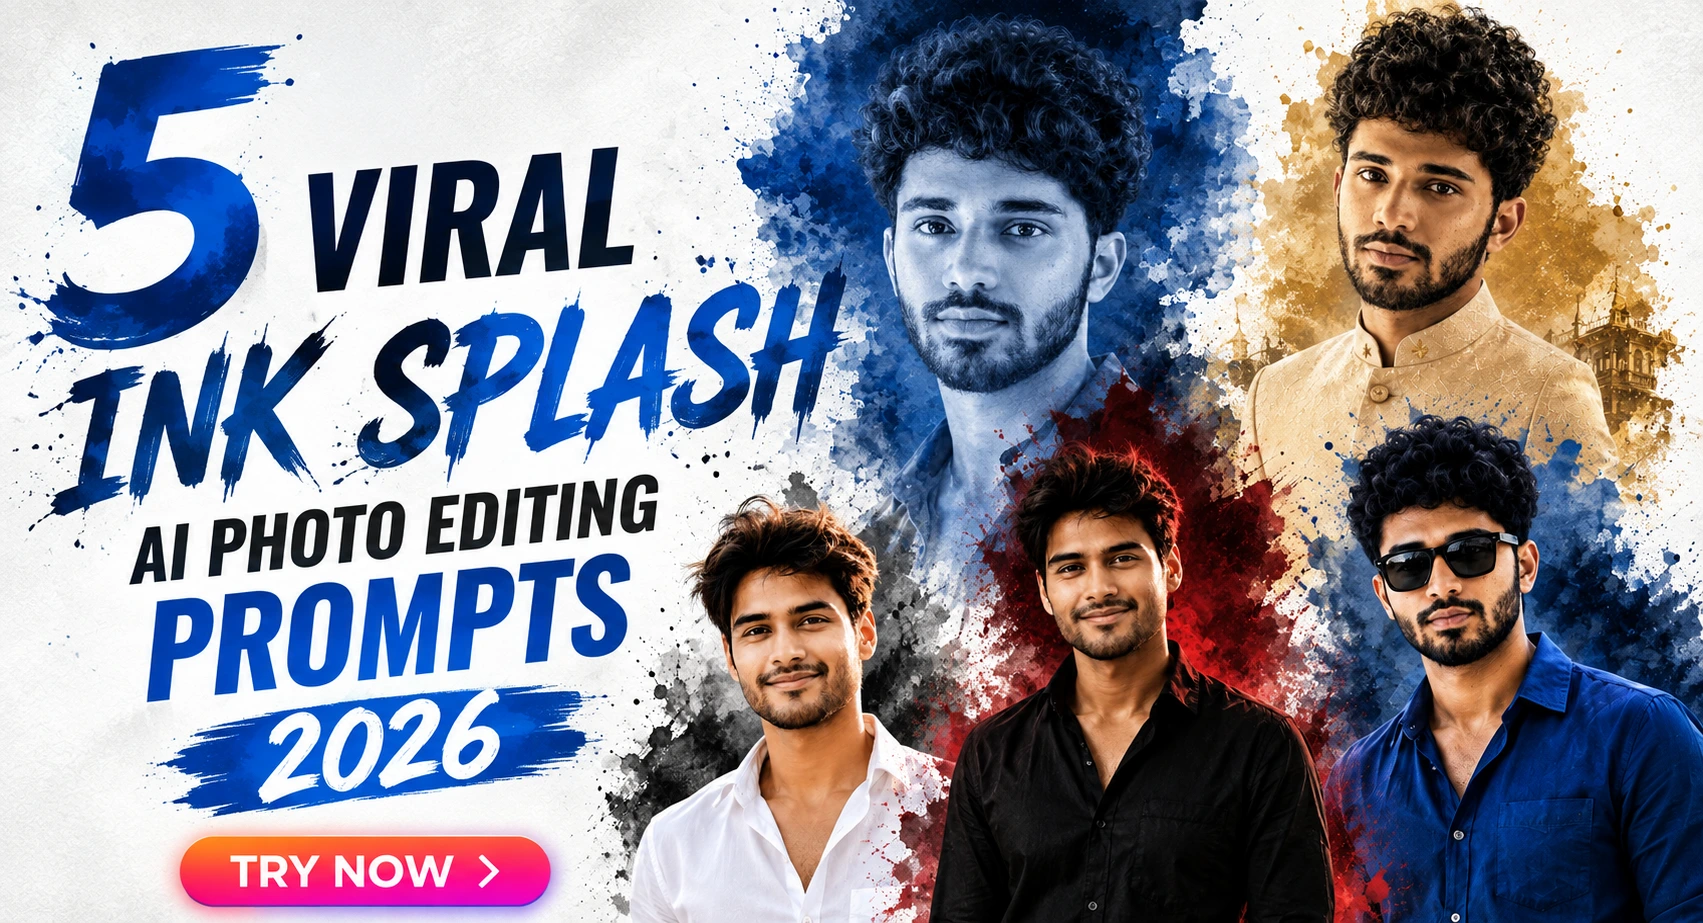
If you want a portrait that feels more like a fashion poster than a normal photo, these five styles give you a useful starting point. The set covers royal gold, neon cyberpunk, black-and-white editorial, red-and-black drama, and a softer pastel treatment. You can use your own portrait as the identity reference and keep the face while changing the visual treatment around it. The strongest difference comes from the background effects: gold dust works well with warm clothing, while neon paint needs a darker setting to stay clean. These Viral Ink Splash AI Photo Editing Prompts 2026 are suited to Instagram posts, profile artwork, reels covers, and vertical poster designs. Start with the royal portrait if you want the safest first test.
Before you start
Your starting photo matters more than adding extra style words. Use a clear front-facing or three-quarter portrait where the eyes, jawline, hairline, and skin are visible without heavy shadows. A plain background also gives the editor more room to replace the surroundings. For these vertical poster concepts, 9:16 works best.
Photo: Sharp portrait with the face fully visible and minimal blur.
Tool: Use an AI image editor that accepts your uploaded reference photo and detailed editing instructions.
Aspect ratio: 9:16 for a phone-screen poster or Instagram Story-style composition.
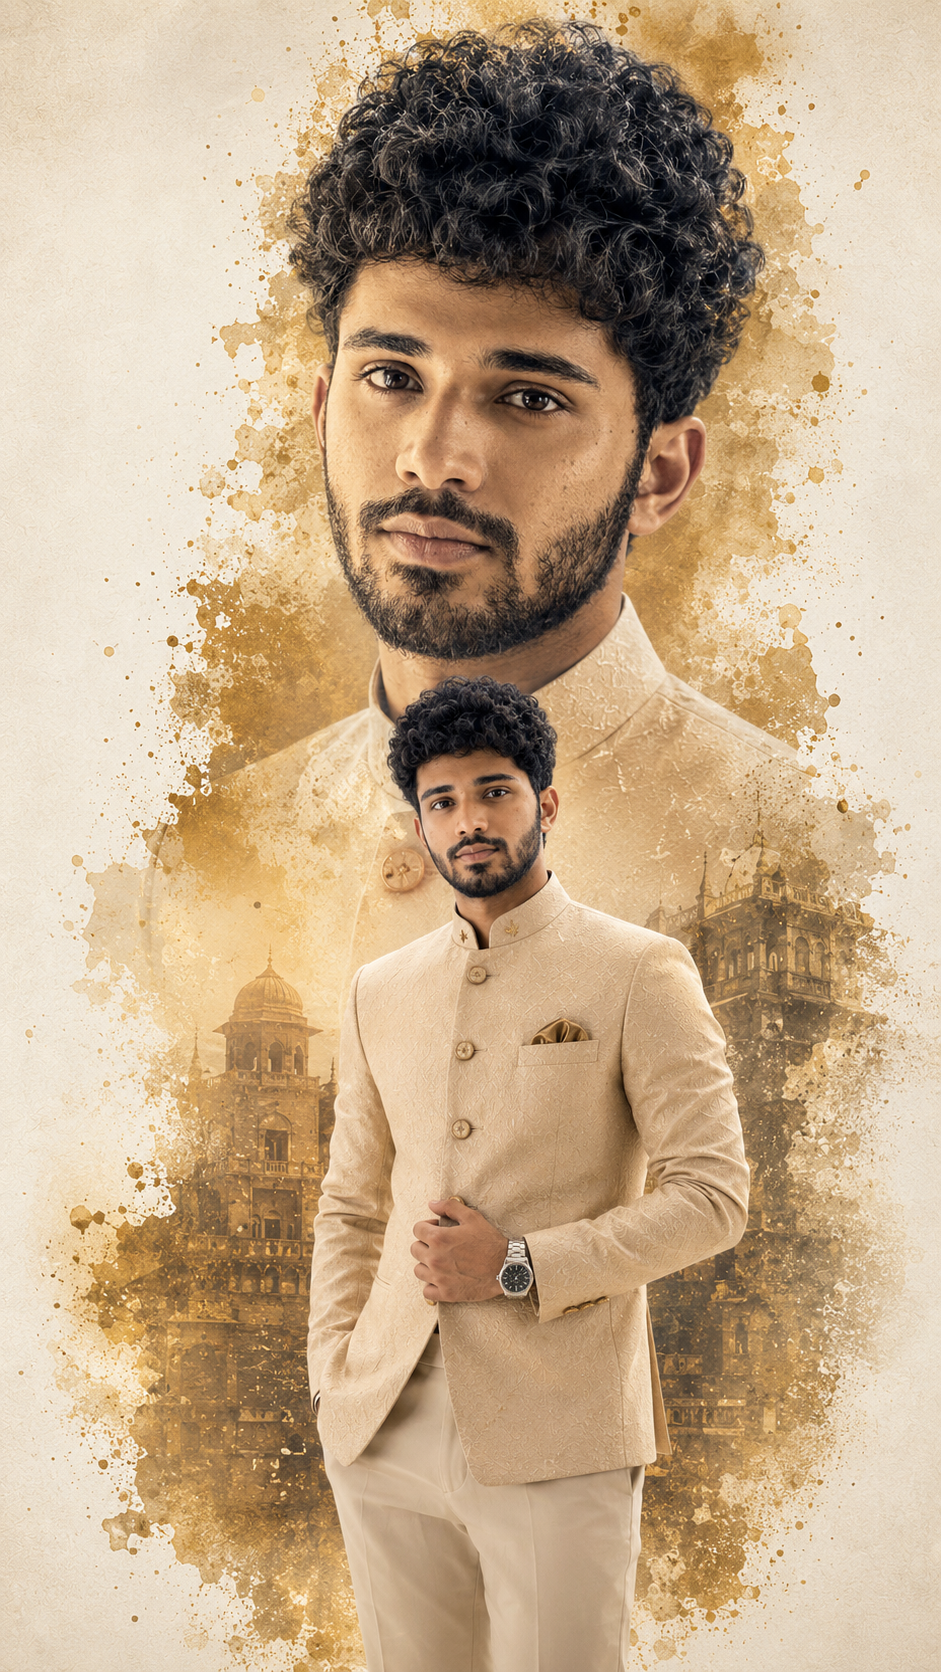
Beige-Gold Bandhgala With Royal Double-Exposure Ink
This version gives you a formal fashion-poster look without relying on a busy location. The beige-gold bandhgala, warm dust, and cream texture work together, while the oversized faded face creates the double-portrait effect. It suits a formal profile picture or festive Indian fashion post particularly well. Keep jewellery restrained; too many rings can become distorted.
The Prompt
Using the uploaded photo, create a formal Indian fashion-poster portrait with a beige-gold bandhgala and a royal double-exposure ink treatment. KEEP - Preserve the person's exact face structure, including jawline, nose shape, lip shape, eye shape and colour, eyebrow shape, cheek structure, hairline, hair texture, and facial hair if present. Keep the natural skin tone and visible texture, including pores, freckles, moles, scars, fine lines, and natural facial asymmetry. Keep the same skin tone across the face, neck, arms, and hands. Preserve the person's real height, build, weight, shoulder width, waist and hip proportions, arm and leg length, hand size, and finger shape. Keep glasses, piercings, tattoos, birthmarks, and apparent age only if they are visible in the uploaded photo. The oversized background face must remain recognisably the same person rather than becoming a different model. CHANGE - Replace the clothing with a [beige-gold bandhgala jacket] made from [structured matte silk-blend fabric], with a clean high collar and subtle tonal buttons. Use [minimal restrained jewellery] only where appropriate. Change the background to [warm cream textured paper] with [soft beige-gold ink and dust textures]. Create a [standing three-quarter pose] in the foreground and a much larger, faded version of the same face behind it. Keep the double exposure layered rather than placing two separate people beside each other. SCENE - Set the portrait in a controlled studio-style fashion poster environment during [warm evening-inspired lighting]. Place the enlarged faded face high behind the foreground figure, blending gently into the cream paper. Keep the dust and ink texture concentrated around the silhouette, with the outer background mostly clean and softly blurred. LIGHT - Use [soft warm light from camera-left] with a [warm-neutral colour temperature]. Illuminate the face, collar, and shoulders consistently with the background glow. Add subtle contact shadow beneath the subject and realistic shadow where the jacket overlaps the body. CAMERA - Use an [85mm lens] at [f/2.8], with the camera at [chest height]. Frame the foreground subject from [head to mid-thigh], leaving enough vertical space for the oversized faded face. GRADE - Use [beige, muted gold, cream, and warm brown] tones with controlled cinematic contrast. Apply fine paper grain, ink texture, focus falloff, and colour treatment consistently across the complete frame. OUTPUT - Create a [9:16] vertical composition at [high resolution], with the foreground figure and faded background face balanced inside the poster. DO-NOT - No face slimming, no skin whitening, no changed eye colour, no plastic smoothing, no invented jewellery or tattoos, no added muscles, no changed height, and no altered finger count or shape.
✦ Curated by MFDA
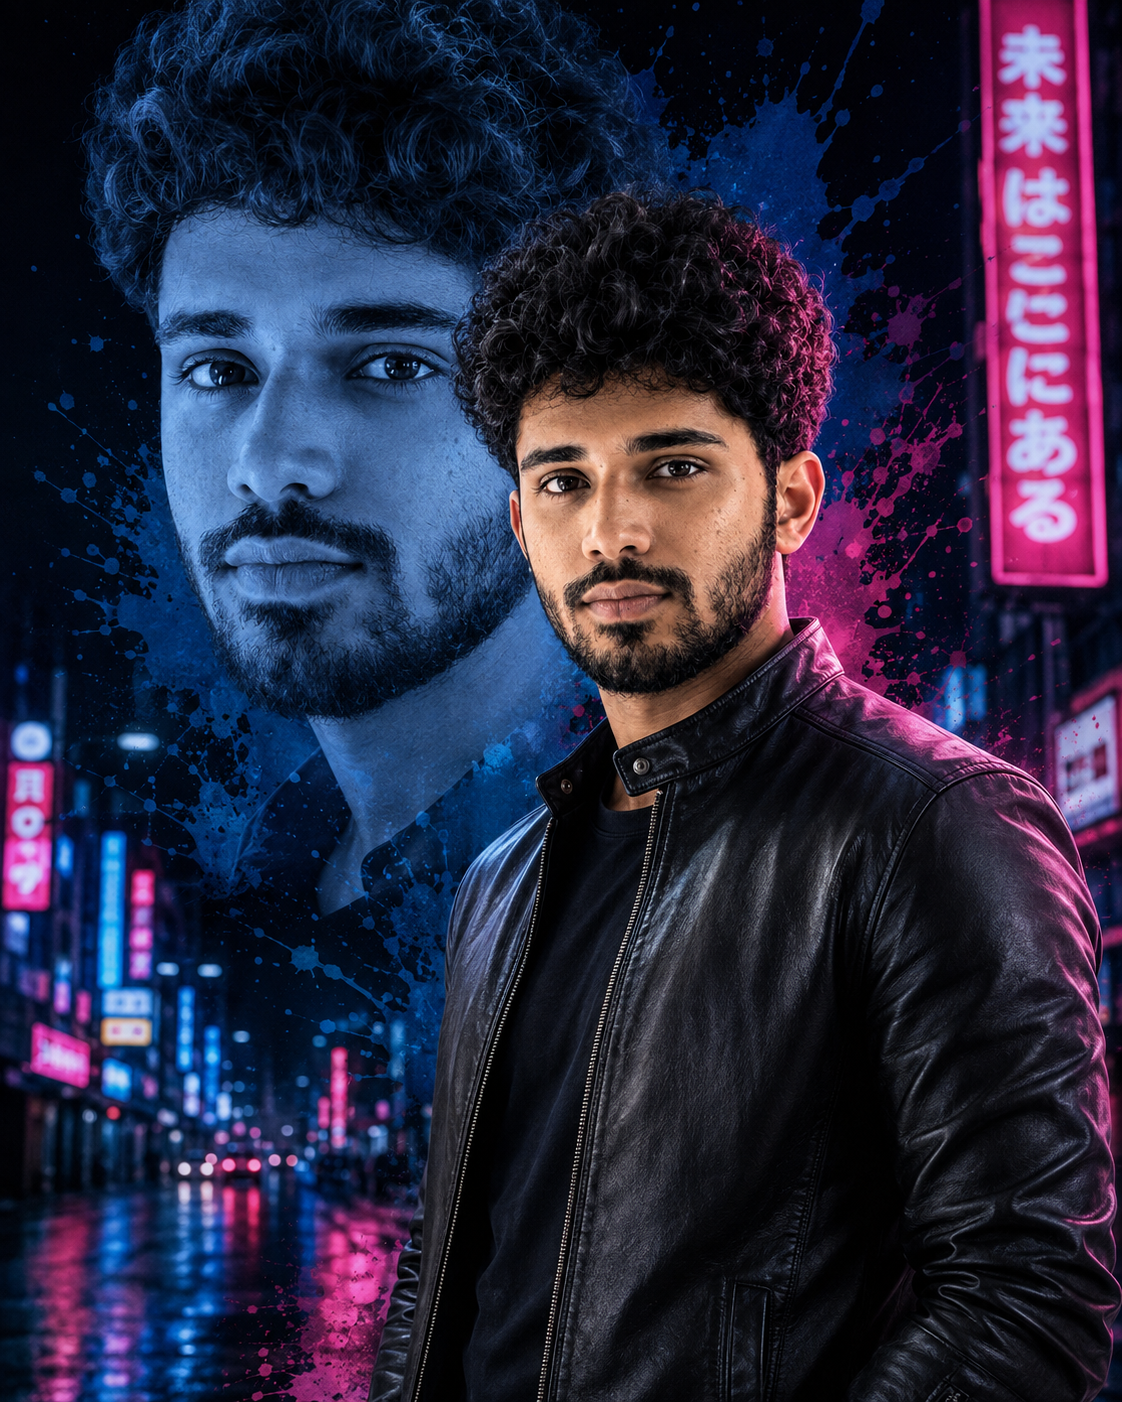
Black Leather Jacket With Neon City Paint Splashes
For a darker, sharper poster, this treatment moves the portrait into a neon street setting. Blue and pink light against black clothing creates strong separation around the subject, while the larger faded face adds depth behind him. The sunglasses are the weak point here because reflections can change between generations, so check the eyes before keeping the final image.
The Prompt
Using the uploaded photo, create a dark, sharp editorial poster portrait set against a neon-painted city street. KEEP - Keep the exact face structure, natural jawline, cheekbones, nose, lips, eye shape and eye colour from the uploaded photo. Keep the original skin tone, visible skin texture, facial marks and natural complexion. Keep the exact hairline, hairstyle, and facial-hair pattern where visible. Keep the person's real body proportions, shoulder width, neck shape and apparent build. Preserve their recognizable identity rather than redesigning their face. If sunglasses are present in the source, keep their frame shape and position while allowing realistic lens reflections. CHANGE - Replace the wardrobe with a fitted black leather jacket with a realistic matte-to-satin leather surface, subtle folds and visible seam construction. Place the subject in a dark urban street surrounded by blue and hot-pink neon paint splashes, with controlled colour separation around the jacket. Add a large, faded monochrome-blue duplicate of the same face behind the subject as a graphic poster layer. Use a confident, slightly turned standing pose with the shoulders relaxed and the face clearly visible. SCENE - Set the portrait on a wet-looking neon city street at blue hour, with distant signs and urban structures behind the subject. Keep the background strongly defocused so the person remains the sharpest element. The oversized faded face sits centrally behind the subject and blends into the dark city atmosphere. LIGHT - Use soft directional light from the front-left at roughly 45 degrees, with cool blue ambient fill and a controlled pink rim from the right. Keep facial shadows gradual and realistic rather than crushing the skin into black. CAMERA - Shoot with an 85mm lens at f/1.8 from chest height, keeping the face sharp and the distant street compressed behind the subject. GRADE - Apply deep blacks, cool blue shadows and saturated pink highlights with moderate contrast and restrained skin saturation. Keep skin realistic while giving the poster a cinematic night-street finish. OUTPUT - Create a vertical 4:5 composition at 2048 × 2560 pixels, keeping the head, shoulders and jacket fully inside the frame. DO-NOT - No face slimming, no skin whitening, no changed eye colour, no plastic smoothing, no invented jewellery or tattoos.
✦ Curated by MFDA
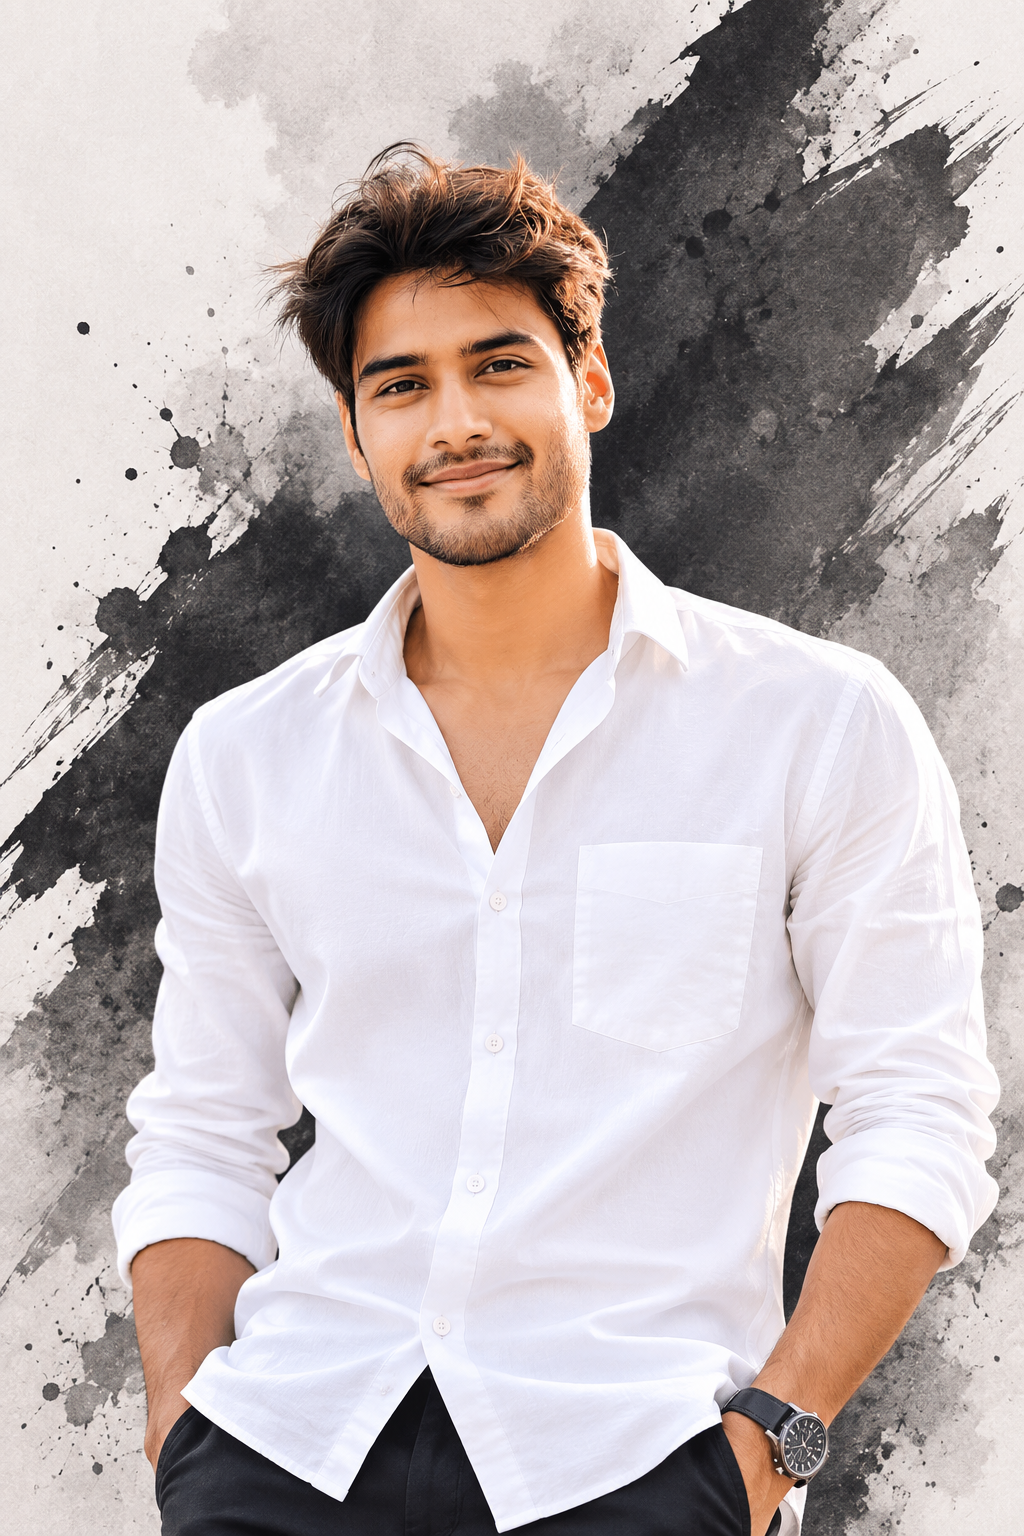
Crisp White Shirt With Dramatic Monochrome Ink Texture
The black-and-white version strips away colour and puts the focus on facial structure, clothing and contrast. A rolled-sleeve white shirt keeps the image simple, while charcoal and ink textures give the background enough movement without competing with the face. This is a good choice when you want an editorial result rather than a colourful social-media poster.
The Prompt
Using the uploaded photo, create a refined editorial portrait of the same person wearing a crisp white shirt against a dramatic monochrome ink-textured background. KEEP - Preserve the person's exact face structure, including bone structure, jawline, nose shape, lip shape, eye shape and colour, eyebrow shape, cheek structure, hairline, hair texture, and facial hair if present. Keep the natural skin tone and visible skin texture, including pores, freckles, moles, scars, fine lines, and natural left-right facial asymmetry. Keep the same skin tone consistently across the face, neck, arms, and hands. Preserve the person's real height, build, weight, shoulder width, waist and hip proportions, arm and leg length, hand size, finger shape, and overall body proportions. Keep glasses, piercings, tattoos, birthmarks, and apparent age when they are actually visible in the uploaded photo. CHANGE - Replace the clothing with a [crisp white cotton-poplin shirt] with [rolled sleeves and a clean open collar]. Keep the fabric naturally structured, with realistic folds at the elbows, cuffs, chest, and waist. Replace the original background with [white and light-grey paper] covered by [charcoal-black ink washes, dry-brush marks, and fine smoky texture]. Use a [confident relaxed standing pose] with the shoulders naturally positioned and the body turned slightly toward the camera. Remove distracting background objects and keep the design focused on the face and shirt. SCENE - Place the subject in a studio-style editorial composition during [late afternoon-inspired neutral lighting]. Keep the ink concentrated behind and around the upper body, with uneven edges that resemble physical charcoal and ink on textured paper. Leave clean white space around the face and keep distant texture softly out of focus. LIGHT - Use [a large soft key light from camera-left] with a [neutral 5000K colour temperature]. Keep gentle shadow shaping on the opposite cheek and under the jaw. Match the shirt highlights and skin shadows to the same light direction. Add a subtle contact shadow beneath the subject where the body meets the ground. CAMERA - Use an [85mm lens] at [f/2.8], with the camera at [chest height]. Frame the subject from [head to below the waist], keeping the shirt, rolled sleeves, hands when visible, and surrounding ink texture inside the composition. GRADE - Use strict [black, white, and neutral-grey grading], medium-high contrast, controlled highlights, natural skin values, fine paper grain, and subtle photographic grain applied consistently across the entire frame. OUTPUT - Create a [4:5] vertical image at [high resolution], with the face clearly dominant and enough negative space for the monochrome ink treatment. DO-NOT - No face slimming, no skin whitening, no changed eye colour, no plastic smoothing, no invented jewellery or tattoos, no added muscles, no changed height, and no altered finger count or shape.
✦ Curated by MFDA
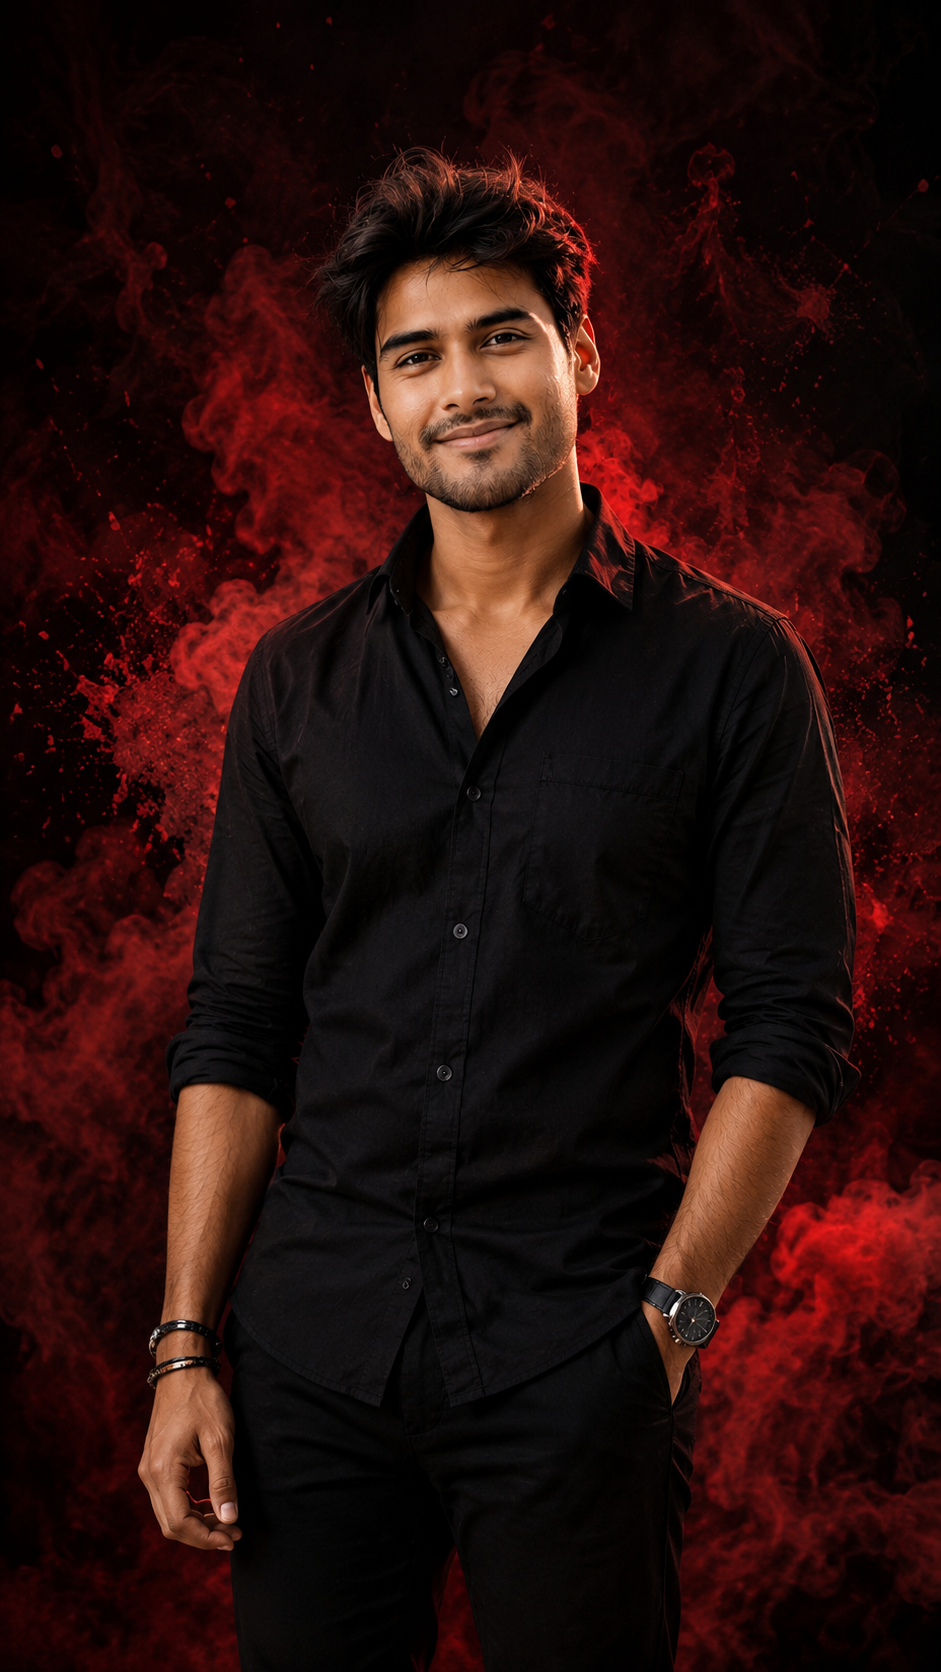
Black Shirt With Fiery Red Smoke and Power-Pose Styling
This one has the strongest visual contrast of the five. The black outfit sits against deep red smoke, ink splashes and rim lighting, giving the portrait a dramatic fashion-poster character. A confident expression works better than an exaggerated smile here. Keep the bracelets and watch simple because small metallic details are more likely to warp inside dense effects.
The Prompt
Using the uploaded photo, create a dramatic fashion-poster portrait of the same person wearing a black shirt, surrounded by deep red smoke and controlled ink-like effects. KEEP - Preserve the person's exact face structure, including bone structure, jawline, nose shape, lip shape, eye shape and colour, eyebrow shape, cheek structure, hairline, hair texture, and facial hair if present. Keep the natural skin tone and visible texture, including pores, freckles, moles, scars, fine lines, and natural left-right facial asymmetry. Keep the same skin tone across the face, neck, arms, and hands. Preserve the person's real height, build, weight, shoulder width, waist and hip proportions, arm and leg length, hand size, finger shape, and natural body proportions. Keep any glasses, piercings, tattoos, birthmarks, and apparent age that are actually visible in the uploaded photo. CHANGE - Replace the outfit with a [matte black fitted cotton shirt] with [rolled sleeves]. Add [one simple metal watch and minimal bracelets]. Change the pose to a [confident upright power pose with squared shoulders and a controlled expression]. Replace the original background with [deep charcoal-black space filled with dense crimson-red smoke and restrained black ink splashes]. Keep the smoke behind and around the body rather than covering important facial features. Add subtle [dark red rim accents] around the outer shoulders and hair. SCENE - Create the portrait as a controlled studio fashion-poster setup during [night-style studio conditions]. Place the densest red smoke behind the shoulders and upper torso, with thinner wisps extending toward the edges. Keep the background dark and softly layered so the face remains the clearest element. LIGHT - Use [a strong soft key light from camera-left] with a [neutral-to-warm colour temperature]. Add [deep red rim light from behind camera-right] along the hair and shoulder edge. Keep the face naturally modelled with controlled cheek and jaw shadows. Add realistic contact shadows beneath the body and where the arms meet the torso so the subject does not float. CAMERA - Use an [85mm lens] at [f/2.8], with the camera at [chest height]. Frame the subject from [head to mid-thigh], keeping the shoulders, shirt, arms, and surrounding smoke visible while preserving natural perspective. GRADE - Use [deep black, charcoal, crimson red, and restrained skin tones], with strong cinematic contrast and controlled highlights. Apply subtle photographic grain, smoke texture, focus falloff, and colour grading consistently across the whole frame. OUTPUT - Create a [9:16] vertical image at [high resolution], keeping the face, upper body, smoke layers, and power pose clearly readable. DO-NOT - No face slimming, no skin whitening, no changed eye colour, no plastic smoothing, no invented jewellery or tattoos, no added muscles, no changed height, and no altered finger count or shape.
✦ Curated by MFDA
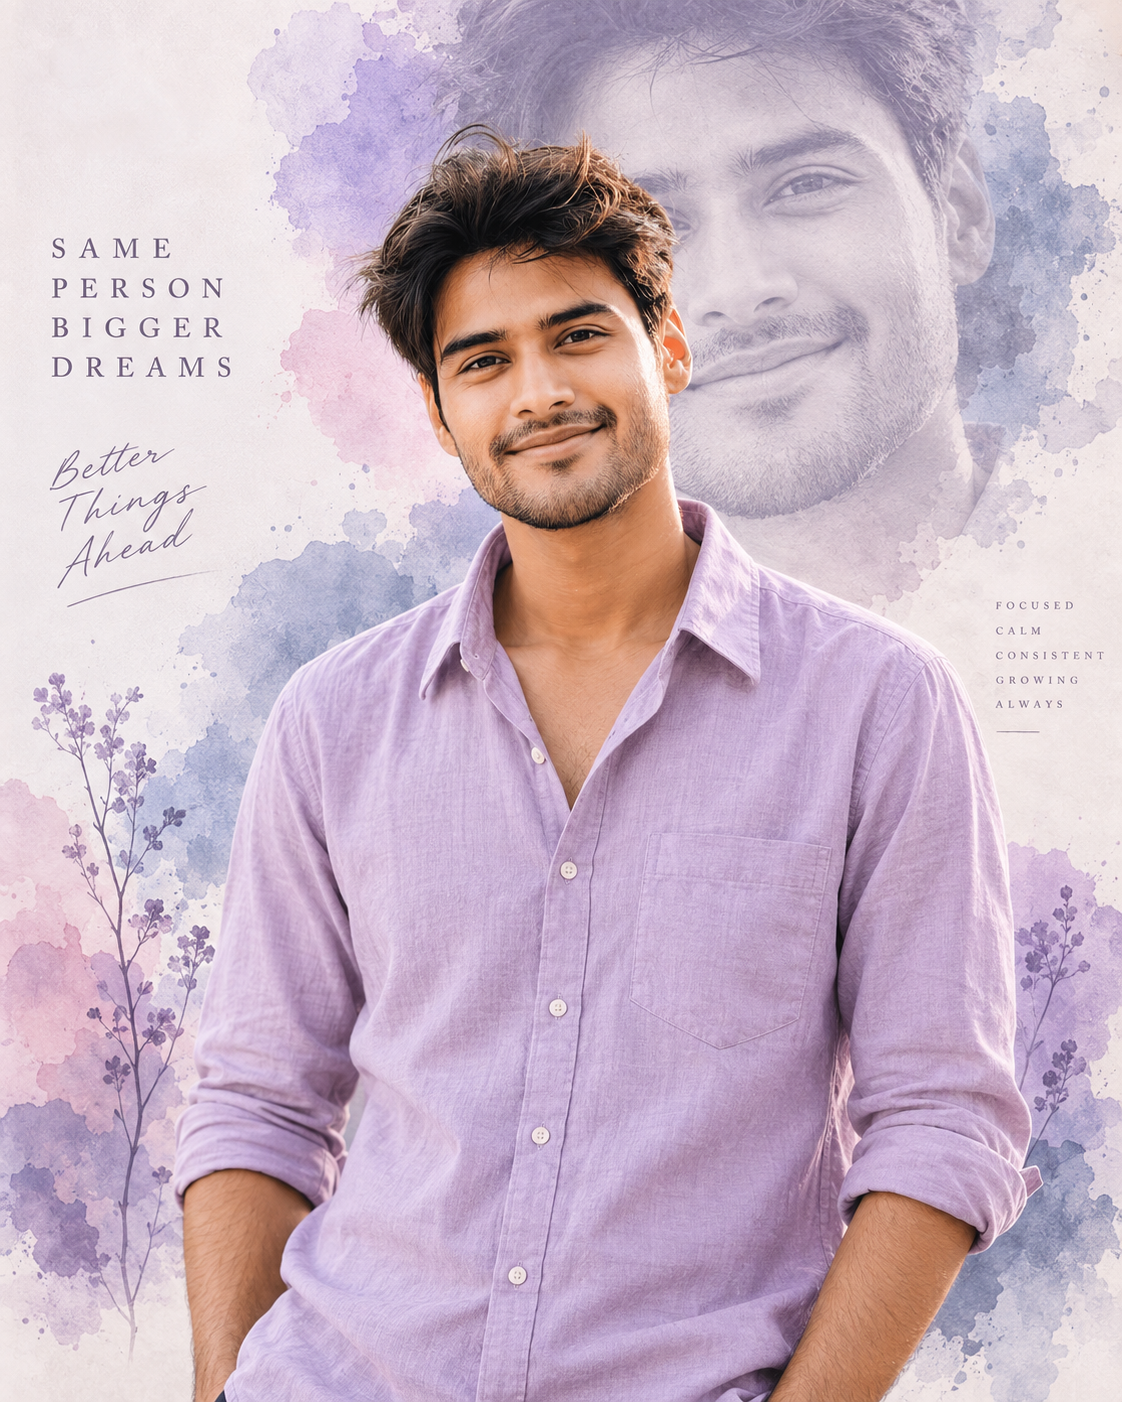
Pastel Lavender Shirt With Soft Watercolor Ink Blooms
The pastel treatment takes the same poster idea in a quieter direction. Lavender fabric, pale watercolor textures and diffused light create a softer portrait that works well for lifestyle or creative-profile imagery. The faded face should remain subtle rather than becoming the main subject. This style can struggle with tinted sunglasses, so remove them if the eyes become unclear.
The Prompt
Using the uploaded photo, create a soft pastel editorial portrait with lavender clothing, watercolor ink blooms, and a restrained layered-face poster effect. KEEP - Keep the exact face structure, natural jawline, cheekbones, nose, lips, eye shape and original eye colour from the uploaded photo. Preserve the person's real skin tone, natural skin texture, facial marks and complexion without repainting the face. Keep the original hairline, hairstyle and facial-hair pattern wherever visible. Preserve the person's real neck, shoulder width, body proportions and apparent build. Keep the identity unmistakably consistent with the uploaded photo. If sunglasses are present, preserve their frame shape and position, but do not allow tinted reflections to obscure or recolour the eyes. CHANGE - Replace the clothing with a clean pastel lavender shirt made from lightweight cotton or fine linen, with natural fabric folds and a soft matte surface. Change the setting to a pale creative studio environment containing translucent watercolor ink blooms in lavender, dusty pink and muted blue. Use a relaxed upright pose with the shoulders slightly angled while keeping the face clearly visible. Replace harsh lighting with broad diffused illumination and apply a low-contrast pastel grade. Add a large, very faint duplicate of the same face behind the subject as a watercolor-washed graphic layer; keep this secondary face substantially softer and lighter than the real portrait. SCENE - Place the subject in a quiet art-studio-inspired setting during late morning, with pale walls and watercolor washes behind them. Keep the physical background softly blurred at approximately medium depth, while the watercolor blooms remain visible as gentle graphic shapes rather than sharp objects. LIGHT - Use broad window-like light from the front-left, around 45 degrees, with soft neutral daylight near 5200K. Add weak ambient fill from the opposite side so both eyes and facial contours remain naturally readable. CAMERA - Use an 85mm lens at f/2.2 from chest height, keeping the face crisp while compressing the background gently. GRADE - Use low contrast, lifted shadows, muted lavender highlights and natural skin saturation, resembling a softly printed watercolor editorial photograph. OUTPUT - Create a vertical 4:5 image at 2048 × 2560 pixels with the head and upper torso comfortably inside the frame. DO-NOT - No face slimming, no skin whitening, no changed eye colour, no plastic smoothing, no invented jewellery or tattoos.
✦ Curated by MFDA
How to use these in your AI image editor
Open your image-generation or photo-editing tool and upload the portrait you want to use as the identity reference.
Add one prompt card at a time rather than combining several styles in one request.
Keep the requested 9:16 output when the tool provides an aspect-ratio or canvas option.
Generate the first version and inspect the face, hands, jewellery, glasses, and large background portrait separately.
If the face changes, don't rewrite the whole request first. Tell the editor to preserve the uploaded facial structure and regenerate the same composition.
If the composition is right but one detail is wrong, make a small follow-up edit instead of starting with a completely different style.
Getting better results
Use a 3:4 or portrait-oriented source photo: a vertical reference gives the editor more usable information for building a 9:16 poster without inventing as much of the body.
Choose shade-lit photos for the royal and pastel styles: harsh midday shadows can make the added cinematic lighting look disconnected from the face.
Keep the original face unobstructed: sunglasses, hands across the face, and heavy hair covering the eyes make identity preservation harder.
For the neon style, start with darker clothing: black or charcoal gives the blue-pink lighting somewhere clean to land instead of washing out the subject.
If the face drifts, change the identity instruction first: don't immediately alter the clothing or background because that makes it harder to tell which edit fixed the problem.
Save the best generation before experimenting: you can then ask for a new colour or background variation without losing the composition you already liked.
I’d avoid adding a watermark inside the generation prompt: text and signatures are often rendered incorrectly, so adding branding later in an editor gives you more control.
When the result comes out wrong
What went wrong | Why it happens | What to change |
|---|---|---|
Face looks like a different person | The editor gives too much weight to the new pose, styling or background | Re-state the uploaded photo as the strict identity reference and ask to preserve facial structure |
Skin looks plastic | Strong editorial processing can remove natural texture | Ask for visible pores, fine facial hairs and natural skin texture with no beauty filter |
Hands or fingers look wrong | Complex poses and jewellery give the model too many small details to construct | Simplify the hand position and remove unnecessary rings or bracelets |
Lighting looks pasted on | The new light direction conflicts with the source photograph | Use a source photo with side lighting that roughly matches the requested cinematic light |
Double face becomes too dominant | The background portrait has been given too much visual weight | Ask for the secondary face to remain larger but more transparent and softly blurred |
Sunglasses distort | Reflections and tinted lenses can be regenerated inconsistently | Remove the glasses first, establish the face and composition, then try adding them again |
FAQ
Can I use these prompts with my own photo?
Yes, you can use your own portrait as the reference image. A clear photo with visible eyes, jawline, hairline and natural skin texture gives the editor more useful identity information. Avoid group photos or images where the face is partly hidden, because the system has fewer reliable details to preserve.
Why does the AI change my face?
The face can change when the requested pose, lighting, clothing or artistic treatment is too different from the reference. Strong effects can also compete with facial identity. If that happens, regenerate with a stricter instruction to preserve the original facial structure, eyes, nose, lips, jaw and natural asymmetry.
Are these AI-edited images free to make?
That depends on the AI image tool and the account you use. Some services provide free image generations with limits, while others reserve certain editing or generation features for paid users. Check the current plan and usage terms of your chosen tool before relying on it for regular content creation.
Can I use these AI portraits commercially?
You may be able to use them commercially, but the answer depends on the tool's current terms and the assets used in your image. Don't assume that an AI-generated portrait automatically clears every commercial-rights issue. Check the service's licence terms, especially if you use recognizable brands, logos, or supplied artwork.
Why does the 9:16 image sometimes crop my body?
A 9:16 canvas is tall but still has limited space, and the editor may enlarge the subject to satisfy the portrait composition. If your body is being cropped, use a source photo with more space around the subject and ask for a full-body composition with the person kept inside the frame.
How do I get a different variation without changing the whole look?
Keep the successful image or generation as your reference, then change only one element at a time. For example, switch the beige-gold outfit to ivory while keeping the pose, lighting, double exposure placement and background unchanged. Small edits make it easier to retain the visual structure you already like.
Will the ink splash effect always look realistic?
No. Dense smoke, paint and double-exposure effects can produce strange edges or overlap the face and hands. The effect is also less predictable when you combine sunglasses, jewellery, dramatic poses and detailed backgrounds. If the first result becomes messy, simplify the foreground before changing the entire concept.
Closing
Start with the beige-gold bandhgala if you're testing the style for the first time because its warm palette is easier to control. Once the face and composition look right, try the neon or red-black version. Keep the best generation as your reference for later variations rather than rebuilding the portrait from scratch.
About the Author
Mina
**AI Prompt Engineer at MFDA.** I design precise, creative prompts for AI image generation, photo editing, portraits, fashion, and visual storytelling.